Saturday, April 14, 2012

Celebration Cake! Dark Chocolate Salted Caramel Layer Cake


I love any excuse to bake a delicious chocolatey cake and what better reason than to celebrate two birthdays!  We celebrated my brother and sister-in law's birthdays over Easter weekend so I decided to attempt a new cake.  I saw this cake a few months back on Pinterest and was waiting for the perfect time to give it a try.  It worked out great because I was able to make the cake layers Thursday night and assemble and frost the cake Friday morning before the family came to town.  It kept really well in the fridge until Saturday night when we finally got to dig in.  If you are like me, you probably only make celebration cakes at busy times, such as when your entire family is in town for a weekend, or you are traveling a distance to be at a special event.  Hence, I believe it's important to find recipes that can be made ahead of time to help maintain your sanity.  This decadent cake fits the bill!    

I warn you in advance, there are several difficult steps to this cake, but nothing you can't master with a little time (and a chemist for a husband!).  The cake is comprised of three layers of moist chocolate cake filled with silky, salted caramel Swiss meringue buttercream and enrobed in rich chocolate frosting.  This was my first attempt making Swiss meringue buttercream and while it was a bit tricky, the results are totally worth it.  I almost passed out on the kitchen floor after my first taste!    

Dark Chocolate Salted Caramel Layer Cake
from Annie's Eats and Sweetapolita (check out their blogs for beautiful pics of the finished cake!)

Ingredients:
 
Cake:
2¼ cups all-purpose flour
2¼ cups sugar
1 cup plus 2 tablespoons dark unsweetened cocoa powder
2¼ tsp. baking soda
1½ tsp. baking powder
1½ tsp. salt
6 tbsp. vegetable oil
1 cup plus 2 tbsp. buttermilk
1 cup plus 2 tbsp. brewed coffee (Note: This enhances the chocolate flavor.  Your cake will not taste like coffee.)
3 large eggs, at room temperature
1 tbsp. vanilla extract

Salted Caramel Filling:
1 cup sugar, divided
¼ cup water (I used closer to 1/3 cup after my first attempt failed)
¼ cup heavy cream
Generous pinch of sea salt, such as fleur de sel
4 large egg whites
1½ cup (3 sticks) unsalted butter, at room temperature

Chocolate Frosting:
12 oz. good quality semisweet or bittersweet chocolate, finely chopped
¼ cup unsweetened Dutch-process cocoa powder
¼ cup very hot water
1 cup plus 2 tbsp. (18 tbsp.) unsalted butter, at room temperature
1/3 cup plus 1 tbsp. confectioners’ sugar
Pinch of salt

Fleur de sel, for finishing


Directions:
Cake:
Preheat the oven to 350˚ F.  Grease and flour 3 8-inch baking pans.  Line the bottoms with parchment paper rounds.  In an electric mixer (you could probably mix by hand but the mixer makes it very easy), combine the flour, sugar, cocoa powder, baking soda, baking powder, and salt.  Mix on low speed to blend.  Add the vegetable oil, buttermilk, coffee, eggs, and vanilla and mix on low speed until well blended and completely incorporated.  Divide the batter evenly between the prepared pans.  If you have a kitchen scale, you can use it to make sure you have equal amounts of batter in each pan.  Bake 20-25 minutes, or until a toothpick inserted in the center comes out clean.  Mine might have been a tiny bit under baked since they sunk a bit while cooling, but they tasted great!  Let the cakes cool in the pans about 15 minutes, then invert onto a wire rack and allow to cool completely.  Remove the parchment paper.

Caramel Buttercream Filling:
Place ½ cup plus 2 tablespoons of the sugar in a medium saucepan.  Mix in the water.  (As stated in the ingredient list, I used closer to 1/3 cup of water because I ruined my first batch when all the water boiled out).  Bring the mixture to a boil over medium heat.  Stop stirring and let the caramel cook, gently swirling from time to time, until it is a deep amber color.  Watch carefully because it will go from a beautiful caramel to burned if left for too long.  Remove the mixture from the heat and slowly whisk in the cream (warning:  It will bubble up so be ready for that) and then the salt.  Set aside and let cool. 

Next, combine egg whites and the remaining ¼ cup plus 2 tablespoons sugar in a heatproof bowl set over a pot of simmering water.  Heat, whisking frequently, until the mixture reaches 160° F and the sugar has dissolved.  I also had to do this part twice since I accidentally scrambled the egg whites the first try.  My temp registered closer to 140, so I would just watch carefully and if you see the eggs starting to scramble take it off the heat asap!  Transfer the mixture to the bowl of a stand mixer fitted with the whisk attachment.  Beat on medium-high speed until stiff peaks form and the mixture has cooled to room temperature, about 8 minutes.  The bowl will feel cool to the touch.

Reduce the speed to medium and add the butter, 2 tablespoons at a time, adding more once each addition has been incorporated.  If the frosting looks soupy or curdled, continue to beat on medium-high speed until thick and smooth again, about 3-5 minutes more.  Blend in the cooled caramel (reheat caramel a minute or so if it has hardened too much) until smooth and completely incorporated, scraping down the sides of the bowl as needed.

Chocolate Frosting:
 
Place the chopped chocolate in a heatproof bowl set over a pan of simmering water.  Heat, stirring occasionally, until the chocolate is completely melted and smooth.  Set aside and let cool to room temperature.  In a small bowl, combine the cocoa powder and water and stir until smooth.  In the bowl of an electric mixer, combine the butter, confectioners’ sugar and salt.  Beat on medium-high speed until light and fluffy, about 5 minutes.  With the mixer on low speed, gradually blend in the melted and cooled chocolate until well incorporated.  Blend in the cocoa powder-water mixture until smooth.

To assemble the cake, level the cake layers if necessary.  Place one of the cake layers on a cake board or serving platter.  Top with half of the caramel buttercream and smooth in a thick, even layer.  Place a second cake layer on top and smooth the remaining caramel buttercream over that.  Place the final cake layer on top.  I put the top layer upside down to make the top nice and flat.  
Cover the top and sides of the cake with the chocolate frosting and smooth with an offset spatula.  Refrigerate until ready to serve.  Because of the high butter content in the frosting and filling (5 sticks!!), we found it was best at room temperature which took about two hours out of the fridge.  Before serving, sprinkle with fleur de sel. 


Yum!

Sunday, March 4, 2012

Mardi Gras King Cake

I know this post is late but I was going through photos today and got excited all over again just looking at them!  This year was our first year celebrating Mardi Gras in St. Louis.  We heard that people do it up big here so I decided to jump right in on the action by bringing along a king cake to our friend's party.  I'm not really sure how or why the tradition started, but the fun part about the king cake is that once it's baked, you carefully hide a tiny plastic baby in one piece and whoever gets the piece is king or queen for the day - fun!

After a little bit of research I settled on a fairly simple version from allrecipes.  This recipe isn't difficult, just be sure to give yourself plenty of time.  I found the dough really easy to work with and practically squealed with delight when it rose like it was supposed to!  I ended up halving the original recipe for the cake but used the full recipe for the filling and frosting and I think it turned out great!  I also made a couple other changes based on the comments I read.  Here is the link to the original recipe but the following includes the changes I made.  Hope you enjoy!
Mardi Gras King Cake

Pastry:
1/2 cup milk
2 tbsp. butter
1 package dry active yeast (2 1/4 tsp.)
1/3 cup warm water
1/4 cup white sugar
1 egg
3/4 tsp. salt
1/4 tsp. nutmeg
2 3/4 cup flour

Filling:
1 cup packed brown sugar
1 tbsp. cinnamon
2/3 cup chopped pecans
1/2 cup flour
1/2 cup melted butter

Frosting:
1 cup powdered sugar
1 tbsp. water

Purple, green and yellow sanding sugar, plus a tiny plastic baby if you choose to try this fun tradition (just be careful to warn everyone so no one accidentally swallows it!).

Directions:
Scald milk (I microwaved for a minute or so), remove from heat and stir in butter.  Allow mixture to cool to room temp.  In a large bowl, dissolve yeast in the warm water with 1/2 tbsp. of the sugar.  Let stand until creamy, about 10 minutes.

When yeast mixture is bubbling, add the cooled milk mixture.  Whisk in the egg.  Stir in the remaining white sugar, salt and nutmeg.  Beat the flour into the milk/egg mixture 1 cup at a time.  When the dough has pulled together, turn it out onto a lightly floured surface and knead until smooth and elastic, about 8 to 10 minutes (I let my KitchenAid do most of the work and only had to knead it together a couple minutes).

Lightly oil a large bowl, place dough in the bowl and turn to coat with oil.  Cover with a damp towel or plastic wrap and let rise in a warm place until doubled in volume, about 2 hours (I used a tip from the comments and placed my bowl in the microwave with a mug of boiling water.  I think the steam really helped my dough rise and made it nice and fluffy in texture once it was baked.).  When risen, punch down.

To make filling, combine brown sugar, cinnamon, chopped pecans and flour.  Pour melted butter over mixture and mix until crumbly.  Roll dough out into a large rectangle (approx. 10x16 inches).  Sprinkle filling evenly over the dough and roll up tightly beginning with the wide side.  Bring the ends together to form a ring.  Place ring on a cookie sheet lined with parchment paper or a silpat.  I placed a small ramekin in the center to help keep the ring shape and removed just before baking.  At this point I ended up covering the ring and refrigerating over night and just added more rising time in the morning.  Let rise in a warm spot until doubled in size, about 45 minutes (more if dough is cold).
Preheat oven to 350 and bake for about 27-30 minutes, until lightly golden.
Nakey king cake - looks like a giant bagel!
Frost while still warm with powdered sugar mixed with water and immediately add the colored sugars so that they stick.  Carefully push the plastic baby into the bottom of the cake.
 
Making this cake was a lot of fun.  I hope to make it a tradition for many years to come!  It also got me thinking that I might be able to use the dough for cinnamon rolls.  If anyone has any experience with this or can recommend a yummy cinnamon roll recipe please share - we will be entertaining family at Easter and I want to make some!  Have a great day!

Sunday, January 15, 2012

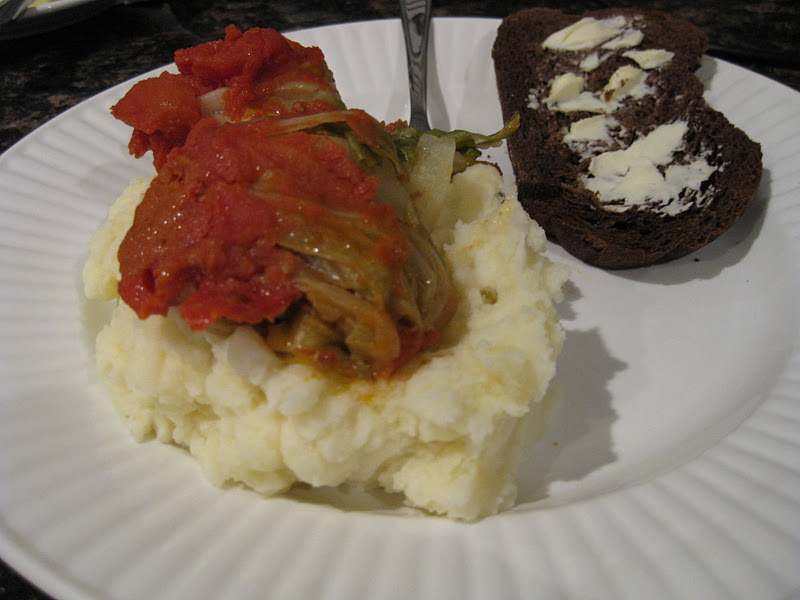
Grandma Sharp's Cabbage Rolls

Happy 2012 everyone!  Sorry for the long absence, one of my New Year's resolutions is to get back to blogging at least once a week, so please feel free to yell at me if I don't.  Anyway, my parents decided to come down to celebrate New Years with Greg and I so my mom agreed to help me throw together a pot of my Grandma's famous cabbage rolls to eat on New Years Day (I think the cabbage was supposed to be good luck for the new year?).  These puppies are the ultimate in comfort food, maybe not the prettiest or healthiest way to start the new year, but certainly the tastiest.  They are super easy to make and they freeze well if you would like to save part of them for another day.  The hardest part is getting the cabbage boiled and separating the leaves, but once you get past that it's smooth sailing.

Be sure to make your rolls in advance since they taste even better the second day.  Per my mom's orders, you must also serve them with mashed potatoes and pumpernickel bread for soaking up the juices!
Grandma Sharp's Cabbage Rolls

- 1 or 2 heads of cabbage (I used one large)
- 2 lbs ground beef
- 1 lb ground pork
- 1 cup minute rice
- chopped onion, to taste (I think I used one medium sized)
- salt and pepper, to taste
- minced garlic (we did not use it in this batch but it adds a nice touch of flavor)
- 28 oz. can diced tomatoes
- 8 oz. can tomato sauce

Core cabbage and bring to boil in a pot of salted water.  Reduce to simmer and cook cabbage until tender, 30 min-1 hour.  In the meantime, in a large bowl, combine ground beef, pork, rice, chopped onion, salt and pepper, and garlic, if using.  Cool cabbage (or don't, but I warned you!), then gently separate leaves, trying to keep them whole.  
Place a leaf on cutting board with stem side toward you.  
 
Place about 1/2 cup of meat filling (loosely packed, do not pack tightly unless you enjoy rock hard, tough meatballs) on top of the leaf, fold sides in, and roll it up.  


Place the cabbage rolls in a large stock pot or dutch oven side by side, seam side down, creating layers as you go.  
 
The first lone roll.  Don't worry little roll, your friends are coming!

 
Pour diced tomatoes and tomato sauce over the cabbage rolls.  
 
Cover, cook on medium for 2 hours.  If boiling too hard, turn down to lower temp.  They are always best the 2nd day!  Serve with mashed potatoes and pumpernickel bread.  
 

Delicious! 

Wednesday, October 5, 2011

Chicken Pot Pie with Peppery Chive Biscuits


So, back to our dinner party from the other night.  Yesterday I posted our dessert, Cream Cheese Stuffed Pumpkin Roll and today I will share with you our yummy fall dinner.  As I stated earlier, this meal is a perfect make ahead meal.  It's special enough to share with friends but easy enough to keep your sanity while entertaining, and we all know keeping our sanity is a good thing.  This recipe calls for a 9x13 pan but I think it would be really cute to cook up in individual crocks if you had them.  The ingredient list is fairly lengthy but most of it is stuff I already had in my pantry.  That said, this is definitely a meal you want to make when you have a little extra time to devote to your dinner, but trust me it will be worth the wait.  The biscuits alone are enough to send you right into a foodie frenzy!  
Chicken Pot Pie with Peppery Chive Biscuits
from Joy the Baker (<- pretty much the coolest chick on the internets)

For the Biscuits:

2 1/2 cups all-purpose flour
1 tablespoon baking powder
1/4 teaspoon baking soda
1 teaspoon salt
1 teaspoon granulated sugar
1/2 to 1 teaspoon coarsely ground black pepper (depending on how spicy you like your biscuits)
1/4 cup chopped fresh chives
1/4 cup (2 ounces) unsalted butter, cold and cut into cubes
4 ounces (half of a brick) cream cheese, cold (I used low fat)
3/4 cup buttermilk, cold

For the Filling:

4 tablespoons unsalted butter
1/2 cup all-purpose flour
2 cups chicken broth
1 1/2 cups whole milk (I used skim)
4 ounces (half of a brick) cream cheese
salt and pepper to taste
1 tablespoon fresh lemon juice
1/8 teaspoon fresh ground nutmeg
3 cups shredded chicken meat (I used a rotisserie chicken)
2 tablespoons butter or olive oil (I used olive oil)
1 small onion, diced
1 small garlic clove, minced
1 1/2 cup thinly diced carrots
1 cup diced zucchini (optional)
1 1/2 cup frozen peas, thawed

Start by making the biscuits.  In a medium bowl, whisk together flour, baking powder, baking soda, salt, sugar, black pepper, and chopped chives.

Add butter and cream cheese to the dry ingredients.  Use your fingers to quickly incorporate the fat into the flour.  Break up the butter and cream cheese with your fingers until some of the fat is the size of oat flakes and some of the fat is the size of small pebbles.  Always remember, less is more in these situations - if you over work your dough, the biscuits will turn out tough.
See the little chunks of butter?  That's good!
Make a small well in the center of the fat and flour mixture.  Add the buttermilk.  
Can I just go swimming in there?
Using a fork, combine the wet and dry ingredients.  Try to moisten all of the flour bits with the liquid.  
Dump the shaggy biscuit dough onto a lightly floured work surface.  Knead together until dough forms a disk about 1 1/2 inches thick.
Don't worry about making it look perfect, the less you handle it, the better!
Use a round, 1 1/2-inch biscuit cutter (I used a drinking glass that was about 2 1/2 inches and it made the perfect amount) to cut biscuits.  Gather the dough scraps, knead for a few turns, and cut out more biscuits until no dough remains.  I got 12 biscuits.  Refrigerate the biscuits until ready to bake.  
 

Next, make the filling.  Place a rack in the center of the oven and preheat oven to 400 degrees F.

Dice onion, garlic, carrots, zucchini (if using), and thaw the frozen peas.  Set aside.

In a medium saucepan over medium heat, melt butter.  Whisk in the flour.  Mixture will be very thick.  Heat for 1 minute.  
Looks weird but stick with it.
Turn to low and add the chicken stock.  Whisk until no flour bits remain. Whisk in the milk and add the cream cheese.  Heat over medium low heat, stirring often, until cream cheese melts and the mixture is the consistency of warm, thick pudding (mine was a bit thinner, I'm assuming from the skim milk).  
Add chicken, lemon, and nutmeg.  Stir.  Add salt and pepper to taste.  
Remove mixture from heat and set aside.
 
In a skillet over medium heat, melt butter (or olive oil, if using).  Add onions and saute until translucent, about 3 minutes.  Add minced garlic and saute for one minute more.  Add carrots, zucchini, and peas.  Cook for  about 3 minutes.  The vegetables will not be entirely cooked through but they will continue to cook in the oven.  
Remove from heat and add vegetable mixture to the creamy chicken mixture.  Stir to combine.

Spoon filling into a 9×13-inch pan.  Remove the biscuits from the fridge and place them on top of the filling.  Brush the tops of the biscuits with heavy cream, buttermilk, or egg wash.
 
Bake for 20-23 minutes, or until biscuits are puffed and golden, and the sides of the pot pie are bubbling.  Remove from the oven and allow to cool slightly before serving.
 

Enjoy the goodness that is chicken pot pie!
 
This recipe is definitely a keeper and one that I plan to repeat many times over the years, thank you Joy the Baker!

Hope you are all having a great week!


Tuesday, October 4, 2011

Rollin' In the Pumpkin


Last Sunday we were lucky enough to have some friends over for dinner (check out The Sweet Art!), which gave me the perfect excuse to spend most of the day in the kitchen.  I love Sundays where there is no rush and I can pour a little extra love into my cooking/baking endeavors.  I have learned that when we are entertaining it is best for me to prepare as much ahead of time as possible.  While I wish I were that person who can chitchat in the kitchen while measuring and mixing and end up with a fabulous meal, that just isn't me.  So rather than stress myself out, I just choose recipes that can be made ahead of time with minimal last minute assembly required.  I mentioned in an earlier post that I recently started using Pinterest, cue menu for dinner party.
I decided on a hearty chicken pot pie followed by a pumpkin roll for dessert, swoon!  I will save the chicken pot pie recipe for tomorrow because right now all I have on my mind is that roll of spiced pumpkin goodness studded with chopped walnuts and stuffed with vanilla cream cheese frosting.  This was my first attempt at making any kind of "roll" dessert and I think it turned out pretty well.   
Cream Cheese Stuffed Pumpkin Roll
from Mel's Kitchen Cafe

Cake:
1 cup sugar
3/4 cup flour
1 teaspoon salt
1 teaspoon baking soda
1/2 teaspoon cinnamon
3 eggs
2/3 cup mashed (canned) pumpkin
1/2 cup chopped walnuts (optional)

Filling:
8 ounces cream cheese, softened
1 tablespoon butter, melted
1 teaspoon vanilla
1 cup powdered sugar

Preheat the oven to 350 degrees. Grease a 15x10-inch jelly roll pan.  Cut wax paper to fit the bottom of the pan and leave an inch overhang on each of the short ends of the pan. Lightly grease the wax paper and sides of the jelly roll pan.
Mix the sugar, flour, salt, soda, cinnamon, eggs and pumpkin in a large bowl and pour mixture over the waxed paper.
Sprinkle the walnuts, if using, on top of the mixture. (I did this but a lot of my walnuts stuck to my tea towel so next time I will probably mix the nuts into the batter.)
Bake for 14-15 minutes until edges pull away from the sides of the pan and center is done.


Lay a large, clean dishtowel on the counter top (it is best to use a dishtowel without any texture – a tea towel or similar towel works best). Spread a thick dusting of powdered sugar all over the towel.
When the cake comes out of the oven, turn the pan upside down on the powdered sugar-laden towel so the wax paper is on the top (helps if your husband is around to help you lift off the piping hot pan!).
Gently peel off the wax paper, being careful not to tear the roll.
Starting at one of the short ends, roll the pumpkin cake up with the towel to cool.
While the roll is cooling, mix the cream cheese, butter, vanilla, and powdered sugar together until it is light and creamy. Once the roll is cool, unroll and with an offset spatula, carefully spread filling in an even layer over the cake.

 (Spread all the way to the edges, I left space because I thought it would ooze out but it doesn't)

Roll it up without the towel and place in the refrigerator (covered with plastic wrap or wax paper) for about an hour before serving. 
 
I dusted mine with additional powdered sugar before serving.
Enjoy!